About Me

My photo
Senior Java Engineer, Wavecell Pte Ltd. Singapore

Tuesday, October 9, 2012

For Better web experience - Full Screen API

Some web applications may require to hide the title bar and the address bar of the browser and show it as a desktop application in full screen view, so that users get the best experience in viewing. Conventional way of doing this is to open a new window using the "window.open" method as follows.

<script type="text/javascript">
 
   var newWindow;
   var url = "www.google.com";
   window.onload = function (url) {
   newWindow = window.open(url, 'name', 'fullscreen=yes,location=0,titlebar=0,top = 0, left = 0,   
                                width = '+screen.availWidth + ', height = ' +screen.availHeight + '');
           if (window.focus) {newWindow.focus()}
        }
 
</script>


Using this method you can customize the new window popup by setting the properties associated with the third parameter. Get More details here


However, due to security reasons modern browsers don't allow to hide title bar and address bar anymore.Therefore alternative is to use a java script library such as Full screen API which employes HTML5 capabilities of browsers without loosing the inbuilt security mechanisms.

Full screen API provides an easy way of presenting web content to users. So far this works for browsers Chrome 15+, Firefox 10+, Opera 5.1+ and still under development stage.

Pretty simple java script code as shown below can be used for enabling full screen in a full web page or in a single element such as in a image.


<button id="flScrBtn" onclick="requestFullScreen(document.documentElement);">Full Screen whole page</button>

<script type="text/javascript">

    function requestFullScreen(el) {
                rfs = el.requestFullScreen || el.webkitRequestFullScreen
                        || el.mozRequestFullScreen || el.msRequestFullScreen;
        if (typeof rfs != "undefined" && rfs) {
            rfs.call(el);
        } else if (typeof window.ActiveXObject != "undefined") {
            var wscript = new ActiveXObject("WScript.Shell");
            if (wscript != null) {
                wscript.SendKeys("{F11}");
            }
        }
    }

</script>


To fullscreenify a element, you need to pass the element to  "
requestFullScreen()" method.
 
To work this code properly it needs to associate with a event handler such as mouse click. This is to prevent using the full screen API  for malicious purposes.

References
1. https://developer.mozilla.org/en-US/docs/DOM/Using_full-screen_mode
2. https://dvcs.w3.org/hg/fullscreen/raw-file/tip/Overview.html

3. https://stackoverflow.com/questions/1125084/how-to-make-in-javascript-full-screen-windows-stretching-all-over-the-screen

Friday, August 17, 2012

How to Use Apache JMeter for Web Services Testing...

Recently, we were able to do some clustering related load testing on Apache Axis2 web services engine focusing on state replication property. I thought of sharing things we did in our tests which were carried out using Apache JMeter.

Apache JMeter is a fully open source pure java tool designed for the purpose of load testing and measuring performance of web applications. According to the documentation, it can be used to test both static and dynamic web resources such as files, Servlets, web services, Perl scripts, Java Objects, Data Bases and Queries, FTP Servers etc. JMeter can effectively use to simulate heavy loads on the above resource types and analyze the overall performance under different load  conditions such as concurrent loads. It also provide various types of visualization techniques to graphically analyze the results obtained from the load tests.

Here are some advantages of using JMeter
  1. Open Source free tool developed by Apache Software Foundation 
  2. Has an active community, good documentation, user manuals and plenty of resources which makes easy to learn, get start and running
  3. Can load test in variety of server types such as HTTP, FTP, SOAP, Database, LDAP, JMS, Mail servers etc.
  4. Support large-scale testing providing concurrency and ability to use various types of loads.
  5. Support for distributed stress testing using multiple systems
  6. API and plug-ins available for customization
  7. Provides variety of test results manipulation and visualization methods
Let's get into the details.

Setting up the Environment
  • JDK 1.5 or later version is required for JMeter latest released version 2.7. Get more details about tested JDK versions and compatible operating systems from here. You can go through my previous post  to get more details about setting up Sun JDK 1.6 in Linux environment.
  • Download JMeter binaries or checkout and build JMeter source available at repositories. Unpack the archive(zip or tgz) to a local folder. Let [jMeterHome] be the unpacked directory. Run JMeter from the terminal as follows.
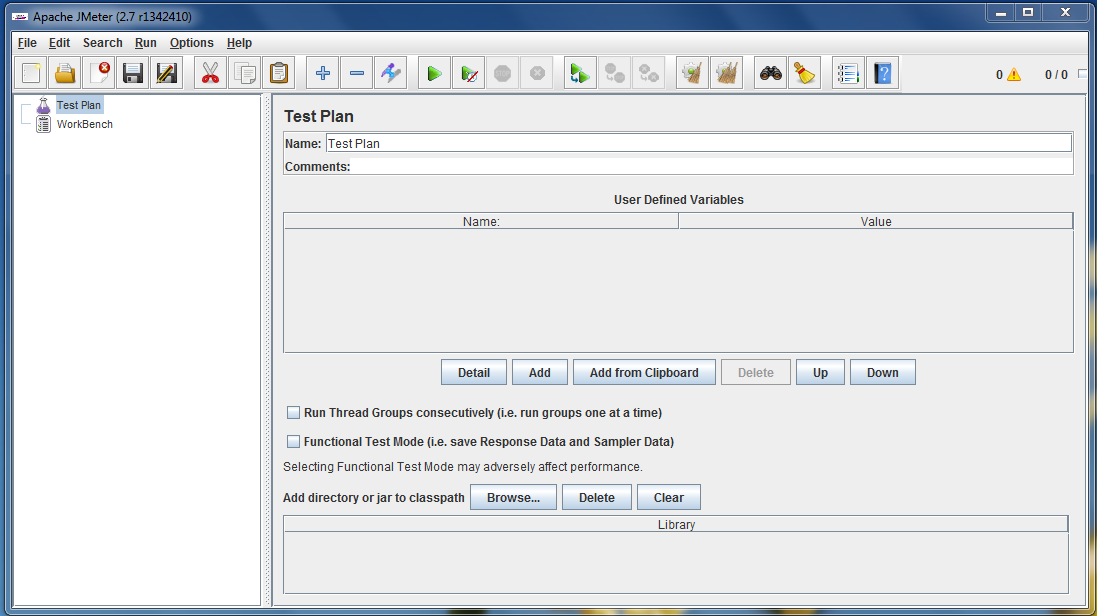
   Figure 01. JMeter GUI.


Setting up Apache Axis2 and deploy the service

Here we will be deploying sample service available in Apache Axis2 called StockQuoteService which provides two method calls.

package samples.quickstart.service.pojo;

import java.util.HashMap;

public class StockQuoteService {
    private HashMap map = new HashMap();

    public double getPrice(String symbol) {
        Double price = (Double) map.get(symbol);
        if(price != null){
            return price.doubleValue();
        }
        return 42.00;
    }

public void update(String symbol, double price) {
    map.put(symbol, new Double(price));
    }
}

You need to build the service definition file (StockQuoteService.aar) and place it in "[Axis2_Home]/repository/services" directory in order to deploy it as an axis2 service(Axis2 running in the standalone mode). If axis2 runs inside a servlet engine like Apache Tomcat relevant directory should be "webapps/axis2/WEB-INF/services".

Axis2 quick start guide and installation guide provides extensive details about creating and deploying services in different ways with Apache Axis2.

Since our purpose is to test the state replication in Axis2 cluster, we need to enable clustering from the axis2.xml in "[Axis2_Home]/conf" directory. To deploy a axis2 cluster, two(or any other number) axis2 instances shoud be started, where "domain name" is set to same value and state replication property is enabled. Make sure instances can communicate among each other, depending on the membership scheme used for clustering.

 If we deploy the two instances in the same host, we need to change the "transport listener" and "localMemberPort" as well. In this scenario transport listener ports are set to "8080 and 8081" respectively in two axis2 servers which are running in the same local machine.

Start the axis2 servers as follows after configuring the axis2 cluster.

Then check to make sure that the service has been properly deployed by viewing the list of services at,

Below is an snapshot of the browser in the above URL once you correctly deployed the service.

   Figure 02. Deployed Axis2 services in the browser


Getting started with load Testing

a) Creating a test plan

Using the JMeter GUI, you can create various types of test plans including, Web service test plan, Database test plan, FTP test plan etc.

Test plan created trough the GUI is saved in .jmx format. Although test plan can be edited by  following the JMeter xml schema, modifying the test plan using GUI is much easier.

In the landing view of JMeter, there are two basic elements. i.e Test plan and Work bench.  
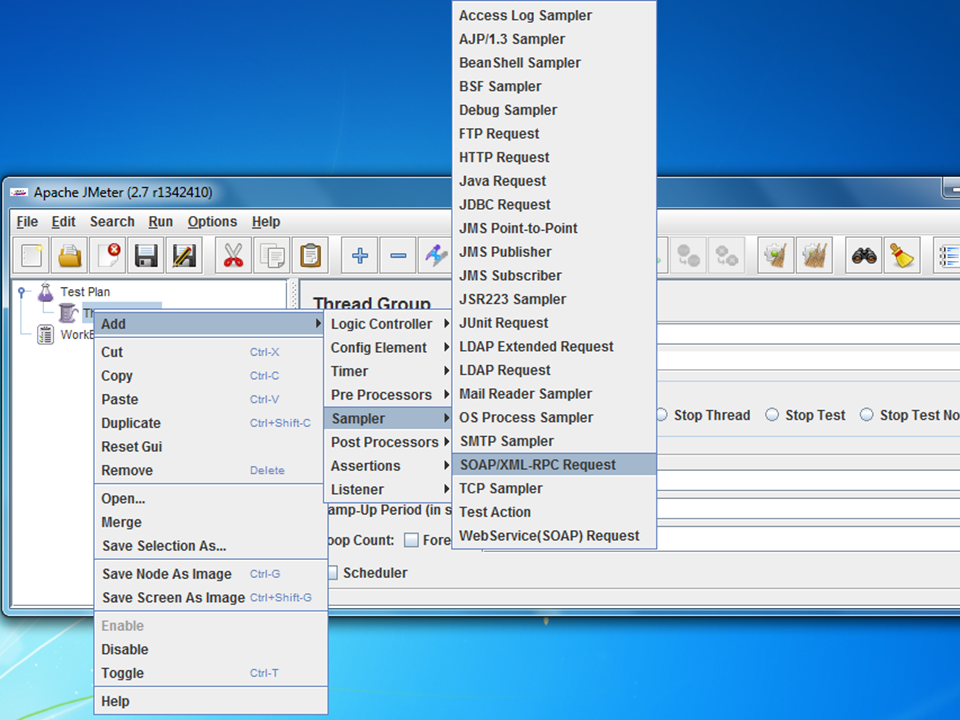
Right click on the Test plan and add a Thread Group element. Create two SOAP/XML-RPC Requests for two method calls associated with the StockQuoteService service.

b) Configuring the test plan

In the Thread Group element, set the thread properties,
    • Number of threads(users) : No. of concurrent users to be simulated.
    • Ramp - up period(in seconds) :Time taken by the JMeter to invoke the threads
    • Lop count : No of times the test plan should be repeated.
These properties can be varied depending on the requirements of the load test.
Shown below are the steps to follow while adding above elements.

   Figure 03. Adding Thread group


   Figure 04. Adding SOAP/XML-RPC request


In the "updatePrice request", set service URL and the SOAP action properties as shown below. Set SOAP/XML-RPC data as,

<soapenv:Envelope xmlns:soapenv="http://schemas.xmlsoap.org/soap/envelope/" xmlns:xsd="http://quickstart.samples/xsd">

   <soapenv:Header/>

   <soapenv:Body>

      <xsd:update>

         <!--Optional:-->

         <xsd:symbol>?</xsd:symbol>

         <!--Optional:-->

         <xsd:price>${__Random(1,1000,)}</xsd:price>

      </xsd:update>

   </soapenv:Body>

</soapenv:Envelope>

   Figure 05. updatePrice request view


Here, updatePrice request will be send to a one instance running on port "8080" and the getprice request will be send to the other instance running on "8081" to test the state replication property of the axis2 cluster.

Similarly, set the relevant properties in the "getPrice request" element. Set the XML-RPC Data as,
<soapenv:Envelope xmlns:soapenv="http://schemas.xmlsoap.org/soap/envelope/" xmlns:xsd="http://quickstart.samples/xsd">

   <soapenv:Header/>

   <soapenv:Body>

      <xsd:getPrice>

         <!--Optional:-->

         <xsd:symbol>?</xsd:symbol>

      </xsd:getPrice>

   </soapenv:Body>

</soapenv:Envelope> 

   Figure 06. getPrice request view

Add a timer to set the "thread delay time". This can be a constant time or random timer such as "Gaussian random timer" to get a more realistic behaviour of the system.

Figure 07. Adding a Timer Element


To visualize the data, we can add Listeners like "Graph results", "View Results in a table", "View results tree" and "Spline Visualizer". In addition we can also send the responses of the service requests to a file by adding a "Write results to a file" in the above element properties. This is an essential feature for debugging and examining errors.

c) Running the test plan

After all the required fields in the test plan filled, save it. Run the test plan from Run-->start or pressing ctrl+r. Use the "Graph results" element to view the chart which is being populated when the load test is running. Graph types like 'Data, average, throughput' can be enabled in the chart to get a clear idea about the test results. Here throughput means the number of requests processed by the server within a minute.

   Figure 08.  Graph results element view.


In the "View results in the table" element, status column illustrates whether service request completed successfully or failed.

   Figure 09. View results in the table


To simulate high load on the server we can increase the no of threads and the loop count.

Once the test is done, "results.jmx" file will be created and this file can be used to visualize the results. loadosophia is one of the sites which offers graph generation services using the XML/CSV results files from JMeter and many other file types such as Apache benchmark tool files etc. You can log into the site using Google account and it provides a workspace to maintain test results related to various projects. Upload the .jmx file and set of graphs will be generated against various parameters such as response time, throughput etc.

Tuesday, January 17, 2012

Getting started with Apache Zookeeper...

It is a well known fact that building reliable and stable distributed applications requires considerable amount of effort and it's not that easy to maintain the properties such as High scalability, Availability, Transparency, performance of these systems. Developing high-quality, flexible, and interoperable software for distributed systems naturally involves challenging complexities and failures, since it is not much evolved and still so many areas to be explored. 

An interesting blog about "Why distributed systems are hard to program" can be found here.

Middle-ware is the bridge that connects application program and the communication infrastructure for basic message passing and support for reliable channels across different hardware and software platforms etc. 

"Apache ZooKeeper is an effort to develop and maintain an open-source server which enables highly reliable distributed coordination."

It is a centralized service for maintaining configuration information, naming, providing distributed synchronization, and providing group services. Although zookeeper doesn't completely prevent partial failures, it provides a set of tools to build distributed applications which can handle failures safely.

Zookeeper Deployment steps..

System Requirements

Supported platfroms
  • GNU/Linux  - development and production platform for both server and client.
  • Sun Solaris   - development and production platform for both server and client.
  • FreeBSD    -  development and production platform for clients only.
                          (Java NIO selector support in the FreeBSD JVM is broken.)
  • Win32        -   development platform only for both server and client.
  • MacOSX   -   development platform only for both server and client.

 Required tools

Setting up the environment
(Linux is used as the development platform for rest of the guide)
  • Install the Sun JDK 6
    • Use a native package managing system like APT or any other popular front-end for apt to install tools listed below. (eg.Synaptic  package manager)
    • otherwise you can download these packages from the web and install them manually.
    • Use these commands in the Terminal to install ,
    • set the JAVA_HOME system variable
    • If your system has installed more than one version of Java such as open jdk and sun-jdk, configure the default java version of the system as sun-java6-jdk by entering the following command in a terminal window and selecting the correct choice.
    • Verify the installation using
    • Terminal out put should be like,
  •  Install Apache ant
    •  Verify the installation using

  •  Install subversion
    • Verify the installation using

  •  If you intend to use git as the version control system
     
         More details about setting up "Git" in Linux environment can be found here
  • Set the Java heap size. 
    • Since zookeeper uses a in-memory data model, swapping can seriously degrade its performance. So it is very important to set the java heap size according to the memory utilization of the system.
      • To set the heap size first open the configuration fire, .bashrc located in home directory,
      • Adding this line to the end of the file will set the heap size to 1GB(min),2GB(max) 
       
Checking out the source
  • Using subversion
    • enter the command below in the terminal to get a working copy of zookeeper source code

    • Using Git
      • This will give the source code of zookeeper in read-only mode. That means you can do the changes to the source code in your local copy only. If you intend to make changes in the code and contribute developing the zookeeper you will have to create a git account and setup a  personal repository in the git-hub first. Commit(pull) request to the original repository can be made through this account. Get more details here.
 

Building the source
Zookeeper build process is developed using the build scripting tool called ant. Apache Ant is one of the heavily used build tool in Java development projects and very popular among open source community. Ant can automate tasks such as compiling the source code, building deployment packages and automatic dependency checking etc. Ant uses a script called "build.xml", which descibes how to carry out the compiling and building process. Detailed tutorial about "How to use ant" can be found here.

-->
Go to the top level directory of the zookeeper trunk.
Use the command below to list out all the targets defined in the build.xml.

Terminal out put should be something like this.

These targets can be invoked using

As a example, to build the binary distribution simply use,

Tips and Tricks... 

If you are working behind a http proxy server, configuring things can be bit more complicated.
    • checking out the source using subversion
      • you need to set the proxy server settings for the subversion client in,
        • $HOME/.subversion/servers  or
        • /etc/subversion/servers 
                 file, under [global] settings. More details can be found here.
    • Checking out the source using git 
    • Building source using ant, online 
      • If you have set the proxy server settings in the system, you need to enforce them by using, 


Handling POST request using akka-http in a akka-actor system

Akka-htp is a well known module for providing full server side as well as client side http stack currently supporting Scala and Java langua...